Minecraft Plushies

One day while looking through our local library we found this book and the girls decided they would like to make a plush cube. (yay measuring and sewing) 🙂

I asked them which one they would like to make.  Elsa decided on the Minecraft parrot and Anna decided on the pig.  I asked them to design them on some squared paper and then work out what and how many materials they would need.  We popped to our local Hobbycraft (brilliant shop btw) and purchased what we needed.

Firstly we measured 6 8x8in squares out of the felt which would be the base colour of the things we’d decided to make.  Pink for Anna and red for Elsa.


We then cut them out and starting to sew them together.  We left the sides which required more detail separate to make it easier to sew.


We then cut out 1x1in squares for the details then pinned them on the base squares. Elsa had face, wings, tail and Anna had face and tail.


They gradually sewed the pieces on and then finally sewing all the base pieces together we left a little gap so we could stuff them.


Then they finished off by sewing up the hole.


The girls did these mostly on their own. It took a little while to complete them as there was a lot to sew, but they completed them.

I think they look great. 🙂

Separating Home from School

Something I wanted to do when we decided to home educate was to keep home and school separate.  We would be spending more time here than previously and therefore it needed to be a nice space for both of those things.  We used to have an area where all our school work would be kept, which was away from the rest of the house.  We have a garden office which was being used for our business, but in March the business moved to an office in our local city.  Therefore we now have this amazing space in the garden available to us.  🙂

So the girls and I discussed what we wanted that space to look like.  The girls decided that it needed to:

  • display their work;
  • be bright and colourful (bit difficult because of the black carpet tiles already in there);
  • have one table so they were able to work together.

We were very lucky as at the same time, the gym the girls attend was giving away tables they no longer required.  So I asked for one of those and my husband put some taller legs on it and we had a lovely bright red table to use.  We bought some vinyl flower stickers to decorate it a bit further.

We had the colourful drawers from when we educated inside our home. I always thought if it’s bright and colourful it would be more inspiring and for the most part that is true, so they have a set each.  We also had the wicker storage system which holds all their craft stuff, like paint and paper.  We just moved all those things into the lovely new space.

We found this gorgeous rainbow rug and I thought that would brighten up the black tiles a bit.  The girls absolutely love this. Aside from being lovely and bright, it’s soft too.


We had a discussion about where we’d like the ‘work’ to be displayed, they decided to separate it into subjects, which is how we had it in the house as well. So at present we have an art wall and a wall that displays French and Vikings.

Anna sits on the Vikings side of the table therefore, she has things useful to her on the wall. (She is learning to read so blending sounds cards).  Also as time has gone on we have added a helpful hints wall for maths.

Our little school room is coming along nicely.  The girls both like being in there and that is half the battle 😀


What? You Home Educate?

Whenever anyone finds out we home educate we are normally asked a lot, and I mean a lot, of questions. I can usually guess what these questions will be as most people ask the same ones.

Until recently I think people just assumed my children were too young for school even though Elsa is obviously of an age where she ‘should be at school’.  Now we are being asked questions on a more regular basis.

Here are some of the most common questions we are asked, so maybe if you see someone who is ‘of school age’ you will already know the answers to some of the questions you may have. 🙂

  • We are semi-structured which means that we do some formal work. therefore some of the answers we give will not be relevant to how other people home educate their children.

Don’t your children go to school?

No they don’t go to school, we home educate.  This means we educate them elsewhere than an educational facility. Until recently this question has not been asked too often. However over the two weeks I’ve been asked this three times.

Is home education legal?

Yes it is legal to home educate in the UK.

Do we have to follow the school curriculum?

We look at the curriculum for Maths and English occasionally, but no we do not follow it properly and legally we do not have to follow it either. The UK school curriculum is one reason we took Elsa out of school in the first place. Too much ‘teaching to test’ and not enough personal development of the children.

Are you a teacher?

I am not a teacher. I am a qualified nursery nurse. Therefore anything we learn we learn together. We discuss what topics the girls would like to do. I prepare the work we do, so I know what I’m going to teach. A lot of the time I ask for the girls to research their own work.  We use resources from the library and visit places of interest if they are deemed educational to the topic we are doing at the time.

How do you know what to teach?

Formally we do Maths and English and that’s it. We very loosely follow the school curriculum for those, but I don’t teach them the way they are taught in school as it all seems so convoluted and difficult. I give my girls different methods of learning so they can choose which way works best for them. They are very different children, so different methods work better for each of them. In school they wouldn’t be able to do that. It would be one way only and if they didn’t get it then they would get left behind.

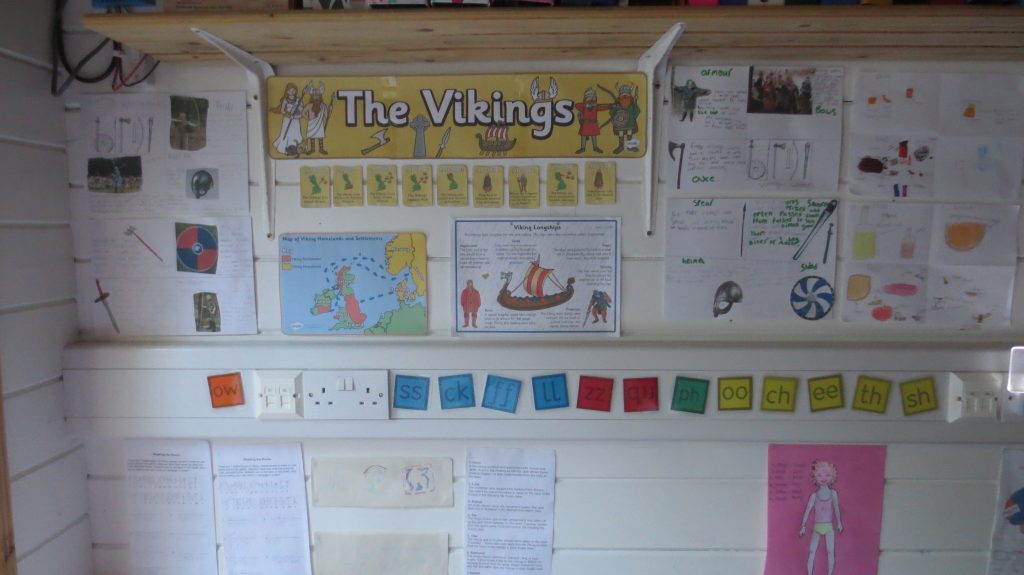
The rest of what I ‘teach’? Well they choose what they are interested in learning. At present we have one topic and one language on the go, they chose one each. I collate a mini curriculum so I can ‘teach’ them the main parts of those subjects. We learn together. That is why I love home education. I’m learning as much as them.

Does anyone check what you are teaching?

Home educated people are not checked by anyone. You can, if you wish, accept a visit from the home education department at the council, who will come and see if you need assistance in any areas and offer advice should you need it. We are happy to have these people visit us and at present they only come to see us about Elsa, but they obviously know about Anna as well. She is still under official school age, so they don’t ask us about anything she’s doing.

Some home educators do not wish to see people from the council and that is their right.  Legally you do not have to, however, we don’t have a problem with them visiting us. They have asked to visit once a year and we can accept or refuse as we wish. However, we can always contact them should we need them.

What about exams?

Just because we home educate does not mean that they can’t sit exams. They can do online IGCSE’s which are the equivalent of ones sat in school.  They can also attend college from age 14 and sit GCSE’s there if they wish.

Will they ever go to school?

I can’t say they won’t ever go to school because it’s their choice. Elsa was in school until the age of 8. Anna has never been. I ask Elsa each January if she’d like to go back the following September. So far she’s always said no (unsurprisingly).

What about college/university?

In the county where we live, the local college has specific places for home educated children which is great. So if my girls would like to go to college they can. They can get the relevant qualifications to go to university from there if they wish. or use the IGCSE’s from above to apply for college or jobs.

What about doing sport?

As a home educator there are so many classes available to us in a number of different subject areas. My girls go to gym and they both love it. Last year I arranged a sports day for our local home ed children. That was a lot of fun. If there isn’t something available during the day (e.g karate or swimming), we can often get groups together and we can contact places and often they will put on classes/lessons especially for us.

How will they socialise?

This is the most common question we get asked. It’s funny because it is the thing I worried about the most before we actually removed Elsa from school.

However, at school the children are mixing with their teacher and their peers. All the same age, all the same people day in and day out. Home educated children meet lots of different children from different backgrounds and different ages. My children attend various clubs during the week to cover the subjects I think are important that I can’t do.  At these they meet and play with other children ranging from new-born – 15. They are also interacting with different adults during the week. I think that my children (particularly my oldest who was shy and quiet) are more confident now.

Do you receive funding?

Oh I wish we did but sadly no we don’t. So the more classes/events/trips you do the more expensive it is. Home education can be as cheap or as expensive as you make it. We do 4 classes a week. Financially that is about £40 a week for each of my girls.  We also do one off educational visits.  As home educators, we can often get discounts or free entry to educational places such as museums or castles if we use them during school hours.

These are the most common questions we are asked, but if you have any that have not been answered here, please leave a comment and I’ll answer them the best I can. 🙂

Learning about Famous Artists – Louise Nevelson

I asked the girls if they would like to do another lesson from the famous artists curriculum.  We haven’t done any for quite a while so the girls were both very keen to do this.  We chose Louise Nevelson this time.  As we always do, we researched our artist a little bit to find out where and when she was born, where she studied and what type of art she was most famous for which is Monochromatic Sculpture. She mainly used wood for her art, but we wouldn’t have had enough so we improvised at bit and over the previous week or two we collected items we could use to replicate her art.

IMG_1034

The girls found some box lids and designed their art pieces in those then stuck them down and left them to dry.

IMG_1033 IMG_1035 IMG_1036 IMG_1041

While it was drying we went to our local DIY shop to buy some acrylic spray paints. Elsa chose pink and Anna chose blue.  We went home and went outside to spray the now dry pieces of art.

IMG_1042 IMG_1043  IMG_1044 IMG_1046 IMG_1047

Finished art.

IMG_1048 IMG_1054

This has been one of their favourite artworks they have done 🙂

Forest School – A Different Type of School

So while I try to do all the formal stuff like Maths and English, Topic and Language, I have to admit that there are some subjects I’m not that able to teach because a) I don’t have the resources, b) I don’t have the space or c) I don’t have the ability.

We love the outdoors and we live in an amazing place to do walks and such, but I don’t like being outside when it’s cold or raining too much, so when my friend suggested forest school I was curious as to what that was.  She told me it’s held at an eco centre and that the building they use if it’s absolutely dreadful weather was made from hay bales and lime by the home ed community.  She also added that most of the time they are outside whatever the weather learning about their surroundings, making dens, cooking on an outside fire and generally doing all I used to when I was 10.

So one day a week, both girls go for the whole day to a safe place with trusted adults where they do all this fun stuff that we are unable/unwilling to do at home.  They both absolutely love it. They get to play with clay and make stuff with willow, (Elsa made a hoopla game). They make swings and play in mud.  They learn about what plants are safe to eat and drink.  They make dampers (I hear a lot about dampers). It all sounds great fun doesn’t it?  Well here’s some pictures to show you that it’s as fun as it sounds. 🙂

17499157_10155449609694245_5344097153483859141_n 17554016_10155449609919245_5503565176259052080_n 17554336_10155449610129245_7615290423843225285_n 17554507_10155449617944245_6063531352991482509_n 17626421_10155449609609245_7724078387431063422_n 17626539_10155449618049245_3441347481678836533_n 17634484_10155449617894245_5606159044830949417_n 18118490_10155554404269245_1424917283983226745_n 18118528_10155554402849245_5774256120683774102_n 18119004_10155554403689245_3055583927453126201_n 18157160_10155554402184245_4088589390896293617_n 18194048_10155554403394245_2987207091995117419_n 18194850_10155554403039245_3482764382124720246_n 18519965_10155622961329245_792738959637411519_n 18528011_10155622964499245_5354825918950832132_n 18581454_10155622959154245_5566971185577081490_n 18622242_10155641973844245_6362442634570504729_n 18670945_10155641973674245_1872646173971866107_n

This kind of place makes me wish I was young again. It looks so much fun 🙂


Vikings – An Interesting Topic – Part 1

Each term I ask my girls if there is anything they would like to learn as a topic.  This term they asked about Vikings. There is quite a lot of Viking history in the County we live in so I hit the internet to find a curriculum to base from then we went to the library  to borrow some books and we were ready.

The first thing we talked about was the most obvious. The longboats.  We talked about the history of them, the size, why they had the shields on the outside and why they burned them.  We completed some worksheets about them then made an origami one to finish that part of the topic. We went to Sheringham which had a replica (small), which they set light to in the evening.

IMG_0726 16836196_10212731260181406_3270459094282735075_o IMG_1055

We talked about the different foods they would have eaten, then we made some Viking bread from a recipe we found in one of the books we got from the library. It was very salty 😀

IMG_0714 IMG_0717 IMG_0718 IMG_0719 IMG_0721 IMG_0723 IMG_0724 IMG_0725

Next we talked about weapons and armour.  We visited our local museum where they have an extensive array of weapons and videos which was really interesting.

WP_20170425_005 WP_20170425_006

Then we made a shield and some swords out of card.

IMG_0747 IMG_0748 IMG_0749 IMG_0750 IMG_0751 IMG_0754 IMG_0758 IMG_0759

The display of work we have been doing.  This includes a timeline through history, some research on runes, food, longboats, weapons and armour, and where the Vikings attacked the UK.

IMG_1058


Tie Dyeing T-shirts

We did some tie dye because we have been learning about rainforests and all the colourful birds, flowers and animals that live there.

First we wet our t-shirts in warm water so that the dye would sink in to the t-shirt.

img_0252 img_0253

We twisted our t-shirts into two different patterns.  In this one we have called it a sunflower fold and did it by twisting from the middle.  We had no rubber bands so we used string to stop it from undoing.

img_0254

We made the dye by mixing the dye powder with warm water and salt.  We put the dye in squeezy bottles so it was easy to put the dye on the t-shirts.  Next we dyed our t-shirts by squirting the dye in random places.  We suggest wearing gloves or something on your hands so you don’t end up with colourful hands.

img_0255 img_0256 img_0257 img_0258 img_0259 img_0261 img_0263 img_0264 img_0265 img_0266 img_0268 img_0270 img_0271

We put our t-shirts in a bucket of cold water to set the dye into the cotton.  Then we rinsed them in warm water to get rid of any dye that didn’t soak into the t-shirt.

img_0277 img_0279

Final results.

img_0282 img_0283 img_0284 img_0285

Left to dry on the washing line.

img_0287

We really enjoyed doing this, it was really fun and we had great results.  We didn’t think they would turn out this well but they did.  They look amazing.  We can’t wait to wear them.

Rainforest Cocoa Bean Madness Game

We have been learning about the Amazon rainforest.  Part of our topic was to create a game.

We brainstormed our ideas on a board about what we might see or come across if you were in the rainforest and then we chose the best ones to make our game.

We decided to make a game where you had to collect cocoa beans as you went through the forest, but you met good and bad things as you went.

We called our game Cocoa Bean Madness.

Firstly we cut out lots of cocoa beans and coloured stones and other bits, which we had printed from the internet.  We used the stones to design the game and we used various bugs, villages and animals as ‘to do’ spots.  We made our own spinner which worked well.   We chose and printed out our own explorers as our moveable piece.  We also decorated the board to make it more colourful, with trees, rivers and other animals and flowers.

img_9777 img_9778 img_9781 img_9782

The rules were, you use the spinner to move around the board and every stone you land on you collect a cocoa bean, but if you landed on a tiger you had to go back to the start, or if you landed on a spider you had to lose all your beans.  If you landed on a village you collected 4 extra beans and if you landed on a parrot you get to go to the nearest village.  The winner was the person with the most cocoa beans when everyone had finished.

img_9783 img_9780

img_0288

It’s a lot of fun to play this game and the coolest thing about it is we created it and made it ourselves.

Homemade Blackberry Jam

We live on a farming estate and therefore there are lots of lovely resources we can look at, find or use.  This time of year is good for wild fruits such as blackberries and elderberries.  We thought we’d make some jam.  I had never made any so it was experience for all of us.

First we picked some blackberries.  Anna proceeded to eat them as she picked but we still managed to collect plenty. We soaked them overnight in water and ice and a bit of salt to kill off any bugs.

IMG_8852 IMG_8853

Today we rinsed and put them in the blender and then added jam sugar. Next we put it on the hob to melt the sugar.  When the sugar had melted we added some butter and let that melt.

IMG_8855  IMG_8856 IMG_8857 IMG_8858 IMG_8859 IMG_8860 IMG_8862

When the butter had melted, we brought it to boiling and let it boil for 4 minutes.

IMG_8861 IMG_8864

We put it in some jars to cool down.

IMG_8866

Then we had some on tiger loaf for lunch.

IMG_8865 IMG_8867 IMG_8868 IMG_8869

The verdict was, it was easy to make and delicious to eat.

Human Body – Our Insides

After completing our skeleton we next decided to do our insides, so Elsa drew around Anna (the keeping still part was pretty difficult) 🙂

IMG_8197 IMG_8198 IMG_8199

We had already ordered some information from the British Heart Foundation, which was brilliant and free (donation if you choose).

We discussed the different organs and what they did, then I asked the girls to put the internal organs where they thought they went.

Anna’s attempt was not bad, but I guess having your brain in your neck could cause a problem and maybe having the oesophagus that way round might make it difficult to eat. 🙂  Elsa’s was near on perfect with the placing of them, not the order though.  Well done girls.

IMG_8202 IMG_8204

Next we drew the organs onto the life size drawing of Anna, which the girls had fun doing.

IMG_8205IMG_8342 IMG_8343IMG_8441

We discussed the large and small intestines in a bit more in depth.  To give perspective, we measured out the actual lengths of them with wool.  The small intestine is 4 times as long as you are tall, and the large intestine is as long as you are tall,  The girls found it fascinating trying to fit it all in the little space in the body.  As you can see we did it perfectly 😉  We also watched a short video which shows the route of the digestive system, which was funny.

IMG_8301 IMG_8300 IMG_8302 IMG_8299

Next job was talking more about the heart and what job it does (very important if you didn’t know) 😉 We did an experiment involving pulse rates, we took resting pulse, then did a minute each of star jumps, running, skipping and dancing to see what happened to our heart rates.  The girls enjoyed doing this and even made me do it.

IMG_8439a IMG_8440a IMG_8382 IMG_8377 IMG_8385 IMG_8383

We talked about the respiratory system and how that works.  We drew and labelled the parts on our body drawing.

The final part of this topic was a discussion about muscles and tendons.  We talked about how they work in pairs, how many there are, what the tendons are there for and then we made a tendon hand which was fun, then Elsa wrote down what she remembered about what we had learned.

IMG_8567 IMG_8566 IMG_8568 IMG_8569

Our completed drawings look great (and very busy) 🙂

IMG_8570

This has been a very interesting topic and we will come back to it in more depth in the future.